Automatically grab screenshots of web pages, sized perfectly for the viewport
I’m a teacher & speaker, so I give a lot of presentations. I learned a long time ago that a picture is often much more effective than words, & since I’m often talking about websites & web services, I end up inserting a lot of screenshots of webpages into my presentations. However, this has traditionally been a time-consuming & tedious process. Why? Because…
- I want the image to fill the entire slide so that it fills the entire screen when I’m presenting.
- My slides are sized for 1024×768, so the image needs to be exactly that big (since I’m using a MacBook Pro with Retina Display, they actually end up being double that: 2048×1536).
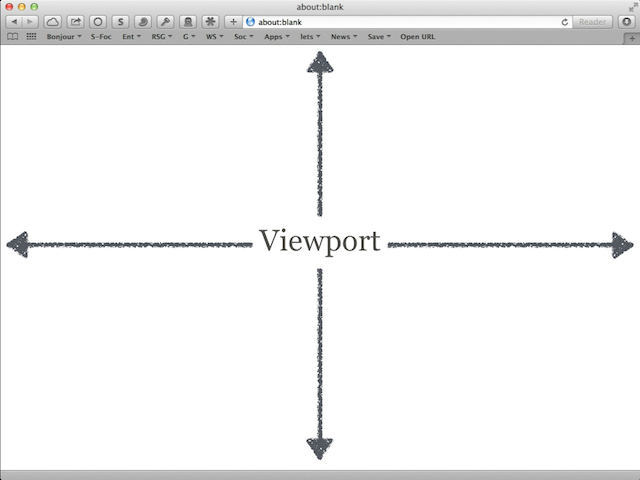
- When taking pictures of webpages, 99% of time I only want the actual webpage itself—what is in the viewport—& not the browser chrome1 around it.

The web browser viewport displays the actual webpage.
That’s pretty specific. It’s easy to take a screenshot on your Mac—just use Command+Shift+4, then press the Spacebar to focus on a window, & then click—but it’s far more difficult to meet the needs outlined above. The problem with the screenshot method is that it makes it easy to focus on a window, but not the viewport. And even then, how do I make sure that the viewport is sized to 1024×768? And on top of that, I still have to manually crop the viewport out of the image. Ugh.
Table of Contents
So here’s my solution, which is working wonderfully. To use it, you’ll need the following:
- webkit2png, installed via Homebrew
- ImageMagick, also installed via Homebrew
- Keyboard Maestro
webkit2png
Paul Hammond, the creator of webkit2png, describes it as follows:
webkit2png is a command line tool that creates screenshots of webpages.
It’s easy to install with Homebrew:
$ brew install webkit2png
The options that you need to know are:
-W 1024(or--width=1024)
The width of the resulting image.-H 768(or--height=768)
The height of the resulting image, but keep in mind that this is ignored if the webpage is taller than the number you specify. As Paul Hammond puts it: “With tall or wide pages that would normally require scrolling, it takes screenshots of the whole webpage, not just the area that would be visible in a browser window.” This is fine, as you’ll see—and actually, I like having the whole page available in an image, just in case I want to use more than the first visible part in the viewport.-F(or--fullsize)
Just get the fullsize grab, without also creating a thumbnail. If for some reason you also wanted a thumbnail, you’d include-T(or--thumb) here.-d(or--datestamp)
Include the date, formatted as YYYYMMDD, in the filename.-D /path/to/image.png(or--dir=/path/to/image.png)
Specify the directory in which images are saved, instead of the current working directory.
So, if I wanted to grab a screenshot of my blog, I’d use this:
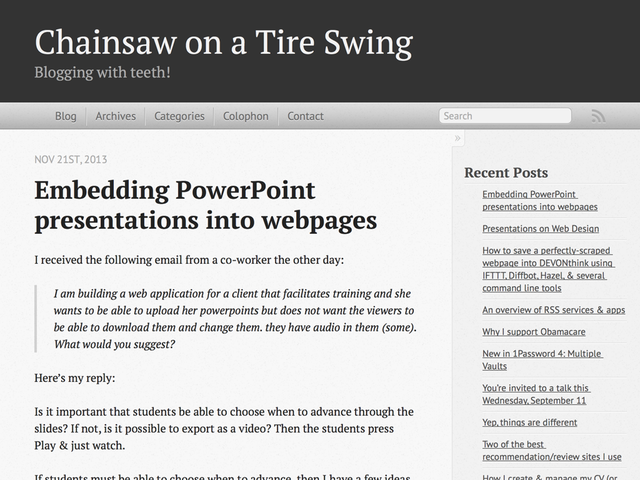
$ webkit2png -W 1024 -H 768 -F -d -D /Users/scott/Desktop http://chainsawonatireswing.com
And the result would look like this (obviously shrunk way down—I don’t want to get too meta here!—& cropped, otherwise it’s 30,000 pixels tall2):

ImageMagick
ImageMagick is one of the most useful & most confusing programs in the UNIX world. It’s amazingly powerful, but along with that power comes a bewildering array of programs (ImageMagick is actually several programs), options, & features. Everytime I want to do something that I know ImageMagick can do, I end up spending about a half hour figuring out how exactly to do it.
What we want to do is crop the image that webkit2png grabbed for us. To do this, you first use the identify command to figure out how wide the image is. Why? Because we’re going to be cropping programmatically, & if the image is greater than or equal to 2048 pixels, then we need to ultimately crop it to 2048×1536, but if the image is less than that, then we need to crop it to 1024×768. Trust me—it works.
Running the identify command on an image with the -format %w (for width) gives me what I want:
identify -format %w 20131128-wwwchainsawonatireswingcom-full.png
2048
The actual cropping is done with the convert command, another part of ImageMagick. The key option we need is (big surprise!) -crop. To use the option, you specify the following:
- width
- height
- x coordinate for the top left corner of the crop
- y coordinate for the top left corner of the crop
I want the image to be 2048×1536, & I want the very top of the image, so I want the top left corner of the crop to match the top left corner of the original image, which would mean an x coordinate of 0 and a y coordinate of 0. So my option looks like this: -crop 2048x1536+0+0.
So, to crop the image that webkit2png grabbed, I’d use convert like this:
$ convert 20131128-wwwchainsawonatireswingcom-full.png -crop 2048x1536+0+0 20131128-wwwchainsawonatireswingcom-cropped.png
First the convert command, then the file name of the full-size image I’m cropping, then the -crop option & its details, & then the name of the resulting cropped image. The results (shrunk way down, obviously):

OK, now let’s automate everything with the always-awesome Keyboard Maestro!
Keyboard Maestro
I use Keyboard Maestro palettes a lot, & Safari is my default browser, so the following is a macro for the Safari palette. However, it would work just as well with any browser that supports Command+L to focus the address bar (which is all of them, to my knowledge).
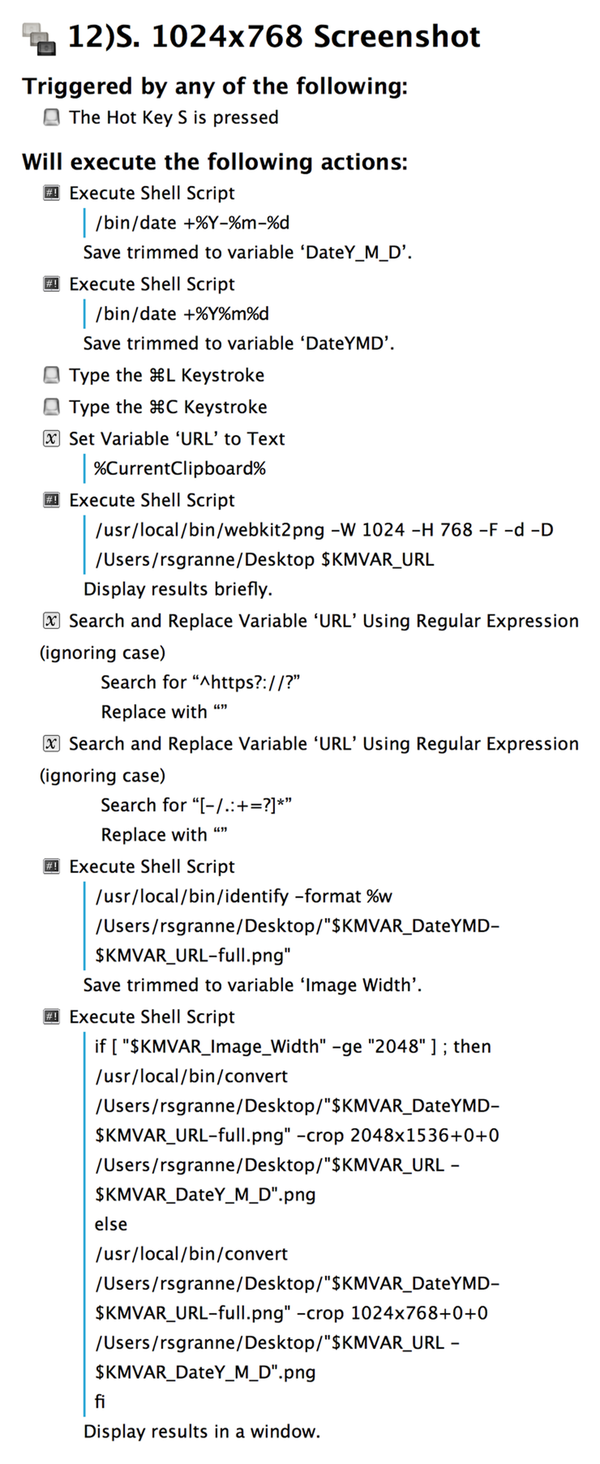
Here’s the whole macro, & then I’ll walk through the components:

I use /bin/date +%Y-%m-%d to generate a date in the format of YYYY-MM-DD, because I want to include the date in the final, cropped filename, & that’s how I like it formatted.
I use /bin/date +%Y%m%d to generate a date in the format of YYYYMMDD, because that’s the format that webkit2png uses when it creates the original image it grabs, which I need to match later.
I then type Command+L to select the address bar, & Command+C to copy the address, which is then saved as a variable named URL.
I then grab a screenshot of the webpage using webkit2png, explained above. Since I’m using the bash shell, I have to reference the Keyboard Maestro variable as $KMVAR_URL; in other words, I have to insert $KMVAR_ in front of the variable name.
I now have a screenshot of the webpage, but it’s almost certainly way too tall, so I need to crop it. Before doing that, I need to generate the filename I want the final cropped to have so that I can use it with the convert command.
To do this, I use regex in two search & replace operations. The first—^https?://?— removes either http:// or https:// from the URL variable. This needs to be done because of the name that webkit2png uses with the files it creates. If the original URL is http://www.chainsawonatireswing.com/2013/06/14/yep-things-are-different/, the resulting filename is 20131128-wwwchainsawonatireswingcom20130614yepthingsaredifferent-full.png. To match that, I need to remove the protocol from the beginning.
You’ll notice that the file name created by webkit2png also strips out other punctuation from the URL as well. To match that, we use the second regex—[-/.:+=?]*—which looks for all instances of those characters & removes them.3
It’s time to use the identify command to find out the length of the image that webkit2png grabbed. The result is stored in another Keyboard Maestro macro: Image Width.
Finally, we get to the real meat & potatoes: a quick shell script that uses the convert command to crop the image that webkit2png created. You will need to change the user name in the path, unless your name is Scott!
if [ "$KMVAR_Image_Width" -ge "2048" ] ; then
  /usr/local/bin/convert /Users/scott/Desktop/"$KMVAR_DateYMD-$KMVAR_URL-full.png" -crop 2048x1536+0+0 /Users/scott/Desktop/"$KMVAR_URL - $KMVAR_DateY_M_D".png
else
  /usr/local/bin/convert /Users/scott/Desktop/"$KMVAR_DateYMD-$KMVAR_URL-full.png" -crop 1024x768+0+0 /Users/scott/Desktop/"$KMVAR_URL - $KMVAR_DateY_M_D".png
fi
Again, the Keyboard Macro is actually named Image Width, but since we’re using it in a shell script, we have to reference it as $KMVAR_Image_Width. The same is true for $KMVAR_DateYMD, $KMVAR_URL, & $KMVAR_DateY_M_D.
The file that is being cropped—the one that was generated by webkit2png—is named something like 20131128-foobarbazquxcorgegrault-full.png, but the cropped file will be named foobarbazquxcorgegrault-2013-11-28.png.
If something doesn’t work, you should see an error message from Keyboard Maestro. Usually my regex missed a character in the file name, so Keyboard Maestro can’t match the file name, which obviously generates an error. Compare the webkit2png-generated file name on your Desktop to the one in the Keyboard Maestro error message & you’ll quickly see the mismatch. After that, simply edit the regex & you should be good to go.
I use the system I’ve outlined here almost every day, & it’s really been an amazing time saver. When I realize that I want to capture a webpage I’m viewing in Safari, I simple press Hyper+` (that’s the Hyper key & a backtick) to bring up my Keyboard Maestro palette for Safari & then press S. About 10 seconds later, if that, I get a notification that there is an image waiting for me on my Desktop. It’s the perfect size for my slides, & it’s even dated so I know when it was taken, & a few seconds later, it’s in a Keynote slide & I can move on to the next one. It’s fast, it’s easy, it’s automated, & it’s awesome. Enjoy.
-
Now the name of Google’s web browser makes sense as a cute little pun, doesn’t it? ↩
-
The maximum height & width captured by
webkit2pngis 30,000 pixels. To paraphrase Bill Gates, that should be enough for anybody. ↩ -
I’ve been adding these as failures occur, so I might have missed one. If I did, please let me know. ↩